
I was inspired when I saw this entry on Matrixsynth, one of the synth blogs I visit. The wood just looked so striking. I knew my synth wouldn't be totally pimped if I didn't have something similar done.
Synthwood is a small business owned by a father and son team, both named Stephen. They specialize in wood cases for vintage synthesizers. The case that caught my eye on Matrixsynth was their handiwork. I contacted them and told them what I was looking for. Basically I wanted the same wood as the Voyager, which was a wood called cocobolo.
Since the wood is exotic there was a bit of delay before they got some to work with, and since I'm in Canada it took forever to have the finished case shipped from Texas, where it was built by Stephen Sr.
I finally got it though, and to my dismay the rough handling of the box during shipment had caused the case to come apart! Basically all of the pieces that were glued together came unglued. As anyone who's done even a bit of woodworking can attest, it takes a lot of impact to break apart two well-glued pieces of wood. The case had even been padded in four or five cubic feet of packing pellets and wrapped in foam, so it would have taken quite a beating to do what was done to it. The good old US postal service must have just beat the shit out of that package.
The fortunate thing was that the wood itself was in good shape. I had heard that one or two other cases had been broken to splinters during shipment, so I was actually lucky. And now I had the choice of either sending the pieces back to Texas to be re-assembled, or I could try my hand at doing it myself. Of course I chose to do it myself. I know nothing of woodwork, but I like to learn new things so I gave it a shot. Stephen gave me his blessing and some pieces of advice, including the fact that cocobolo is poisonous. I guess I won't be eating it!
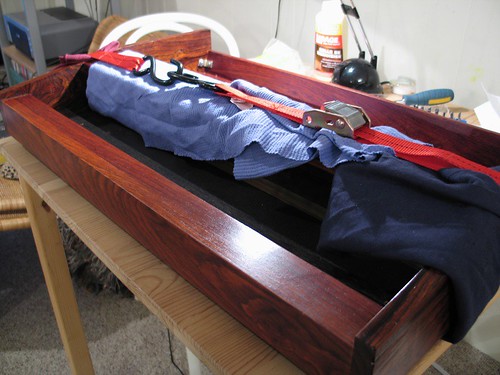 All of the pieces fit together, so all I really had to do was sand off the old glue and re-glue it together. Normally when you glue wood you're supposed to clamp it together while it sets. Because of the size of the case I wasn't sure how I was going to accomplish this, but I came up with a solution that worked well, as you can see in this photo. I found this strap device at Home Depot and it was perfect.
I wish I could say I glued it together perfectly in one try. It actually took me three tries because I kept finding mistakes I'd made with the alignment of the pieces. It had to be perfect, so I had to break it apart a couple of times and try again. I eventually got it though.
All I had left to do was to put the synth into the new case. This was a process too - I had to do a bit of cutting and drilling. I'll spare you any more details. After it was all done I gave it a new coating of linseed oil to bring the case to its full glory, and I was done:
 If this isn't a pimped-out minimoog I don't know what is. It was even featured on Matrixsynth, which is flattering. If you click on the photo it will bring you to more shots with detail of this gorgeous wood.
There you have it. This entire Pimp My Moog project was made possible by a few key people. I'd like to thank the Joneses of Synthwood (particularly Stephen Sr., who spent a lot of time on the phone with me), Archive Sound for the keyboard bushings, Mr. Kevin Lightner for his expertise and willingness to share, Fantasyjackpalance for the Minimoog resources, Dimension 3 Plastics in Vancouver for the clear wheels, and the folks at Moog Music for the tips (not to mention the stickers and youth-size t-shirt, which fits perfectly).
I'll have more projects to write about here soon, but that's it for a bit. Thanks for reading.