skip to main |
skip to sidebar
With the taste of success still on my lips (or was it lacquer thinner?) I decided the next step in the Minimoog restoration would be a bit bolder. The Minimoog and I had reached a special stage in our relationship; I was one of the few lucky guys to have had a peek under her hood, so to speak. Now I wasn't so afraid to turn her around, brandish my tool, and poke around inside of her. And eventually I got around to doing some repairs as well (nyuk, nyuk).
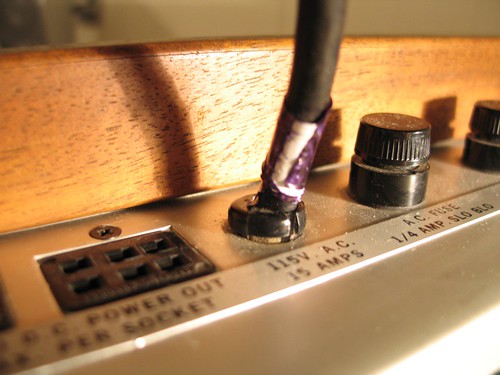
So I set my sights on one of the other minor issues I wanted to fix: the power cord. Obviously Backbone is a band that rocked pretty hard on stage, and nowhere was it more evident than the Minimoog's tattered power cord.
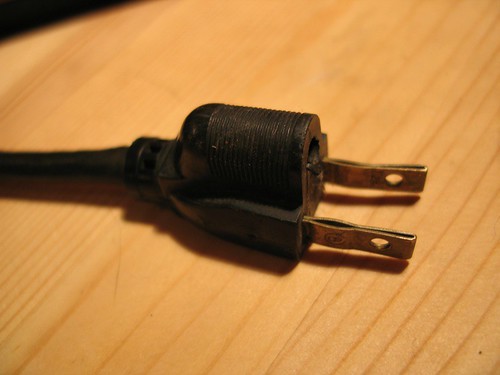
As you can see, the cord was torn and taped up right were it goes in to the synth. Also Backbone managed to rock so hard, the ground prong came right out of the plug. That's just the awesome effect of Backbone. And sure, the synth worked just fine with the cord like that. It could have even been an advantage to not have a ground prong on the plug - what if Backbone was rocking a stadium that only had two-prong outlets? But I just couldn't bear it. It felt like the cord was neutered at one end and just broken at the other end. So this was my next project.
Inside the synth, the power supply to the electronics is all on the left hand side, near where the power cord comes out. A couple of circuit boards block a clear view of the wiring, but fortunately the boards are connected via sockets, and easily removed. It looked like this:
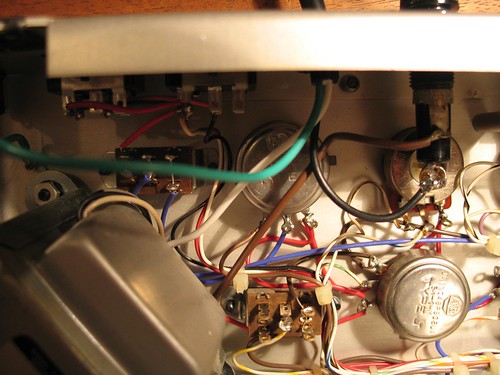 The power cord has three wires: black, white and green. The black wire (the "hot" wire) is connected to the bottom of a fuse holder on the right. The fuse holder is connected to a brown wire, which leads to the transformer (the silver box on the left). The white ("neutral") wire is connected to part of the power switch. The green wire (the ground) leads to one of the screws that hold the transformer in place. I made sure I didn't get any of that mixed up. I didn't want to fry the synth.
I used a 10' computer power cord (I had to lop off the female end) to replace the original one. The operation was actually pretty simple, and it afforded me the opportunity to use my soldering iron, which I haven't touched in a while. I love the smell of melted solder rosin. The above picture is of the completed operation, from the inside. Here's the outside:
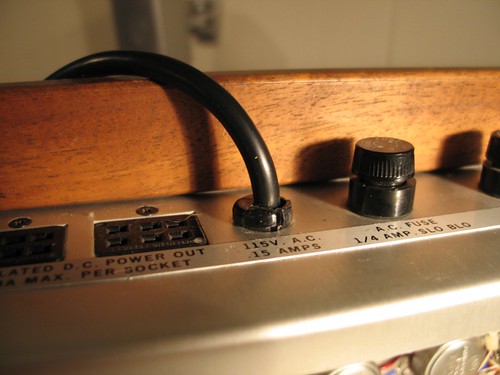 Probably the biggest challenge (which I realize now is really simple) was figuring out how the strain relief came out. That's the black plastic bit that wraps around the cord as it comes out of the synth. In the end it just needed some perseverance with needle-nose pliers, squeezing from underneath. As you can see, the new cord fit snugly into the strain relief, and eventually it all got put into place.
As I mentioned before, my Minimoog has a few aesthetic issues that I plan to work on. Generally it looks good. The keyboard is in relatively good condition, the controls work well save for a couple of pots that make noise... You can tell it wasn't made yesterday, but you can also tell that it's been handled well over the years. If it was in bad shape I wouldn't have bought it.
The most glaring of the cosmetic issues on the synth could only be seen from the back:
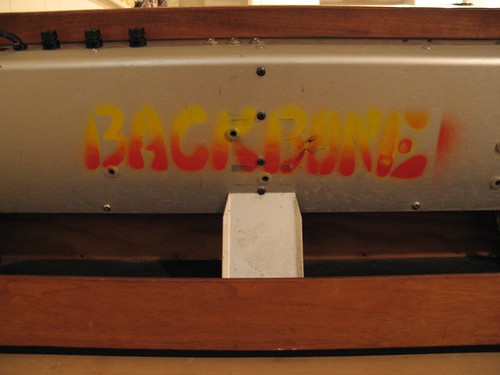 Apparently the original owner of the Minimoog was in a band called "Backbone". Evidently this individual decided that the best way to advertise the band's name was to spray paint a logo on the back panel of the synth. As you can see, it looks AWESOME. I can just imagine how excited the other members of Backbone must have been when they saw their badass logo on the Minimoog.
"Dude, that looks killer. You can't even tell that it's a home job - that's how pro it looks."
"Yeah, people are going to be asking how we managed to get Moog to make us a custom synth with our logo on it! How did you do that anyway? It's TWO colors!"
"Easy. I just used a stencil, and sprayed red on the bottom and yellow on the top. I got a little bit of red outside the stencil on the right, but no one will see that."
"It looks like the letters are coming out of a glorious sunset, reminding us of the glory of Backbone."
...and so on. Actually it did have a little humour value, but that faded quickly enough and I just wanted to get rid of the logo. It's also sprayed on to the bottom of the synth, but NO ONE sees that, and I'm going to replace the wood eventually anyway. So after I did a quick Google search to make sure Backbone wasn't some famous old rock band (I had visions of auctioning it off to a wealthy Backbone fan for thousands of dollars), I set out to remove the ugliness.
The first step was to remove the back panel. It's held on by about a dozen screws, and it was fairly easy to do. It gave me an opportunity to have a peek inside the Minimoog:
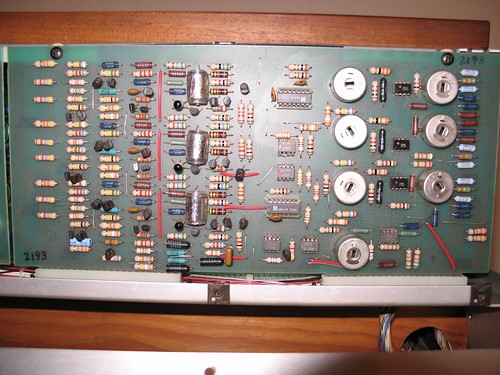 Clicking on the image will bring you to a bunch more shots. Here you can see the osc board. That's about as technical as I get with these things, is being able to identify this particular board.
Having removed the back panel, I removed the four machine screws designed to keep the Moog in its "upright" position, and I wiped off all the dust and grime. I had a few solvents that I was going to try for the job of removing the paint.
Before I began wiping chemicals all over the outer panel of the mini, I thought it might be a good idea to test them out by applying them in small hidden areas on the inside of the panel. I didn't want to end up with some chemical reaction that ruined the panel altogether. Fortunately there was nothing to worry about, and lacquer thinner turned out to be the solvent of choice.
 Using the "clean rag" method, I put solvent on a small clean area of my rag, and started wiping up the paint, which basically melted under the lacquer thinner. I worked on it a little bit at a time, using a clean part of the rag with each pass. It was more time consuming this way, but it made very little mess and the paint was cleaned off quite well.
I thought it would be prudent to use gloves while handling such potent chemicals, so I wore a pair made of polyurethane. They lasted about a minute before they started to melt. I guess lacquer thinner and poly gloves don't mix. Well, actually they do mix and that's the problem, if you want to get technical. Another thing I learned is that kitchen sponges which have a green scrubby material on one side shouldn't be used with solvents. Turns out the scrubby material is made of some kind of plastic that dissolves rather quickly. Also, water doesn't rinse lacquer thinner out of a rag. And don't sniff the rag to see if it still has lacquer thinner on it. Seriously.
The panel also had tiny areas that looked like rust, and I managed to get that off with a little CLR cleaner (which I also spot tested on the inside of the panel).
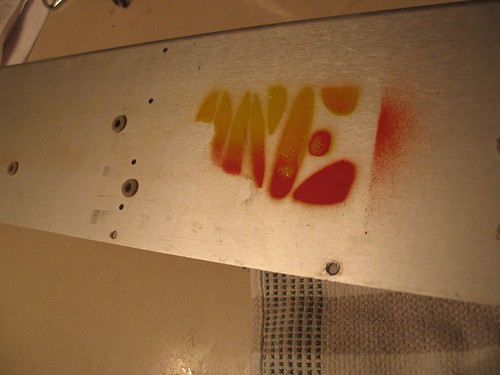
In the end the panel is nice and clean. If you look at it under bright light at a certain angle you can still see the shape of the Backbone logo. I tried scrubbing it out with steel wool, and it just wouldn't disappear. If anyone knows what might do the trick be sure to let me know. It's hardly noticeable though, and I'm quite happy with the result. Here it is:

Welcome to the repository for all of my synth-related projects. If you love electronic musical instruments like I do, I hope you will appreciate the contents of this blog. I must warn you of two things: first, it's going to get very geeky. Second, I know VERY little about electronics, so I am kind of flying by the seat of my pants here. If you're here looking for knowledge you may find it in the "resources" section on the right, or perhaps in the comments if anyone happens to say anything enlightening (or indeed anything at all). I'm not going to pretend to be an expert about anything electronics-related, and hopefully this will be a learning process for me.
Allow me to introduce you to a good friend of mine:
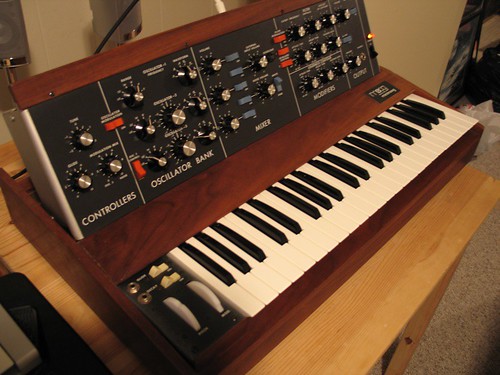
This is, of course, a Minimoog synthesizer, model D, made in 1973 by Moog Music Inc. If you've never heard of it you'd better ask somebody.
I purchased this synth about six months ago, and it sounds amazing. It's got the "original" oscillator board (later Minimoogs have a re-designed osc board to improve tuning stability; some folks say they don't quite have the character of the original synths). Work has been done on the synth to fix tuning issues, and it seems to be fine in that department. It sounds warm and, pardon the cliché, fat.
There are a few minor aesthetic issues with the synth though (but come on - it's 34 years old!), and that is the subject of the first series of posts I will be making to this blog. I will be cleaning it up, doing some minor part replacement, restoring the keyboard, and hopefully giving it a brand new custom-made wood casing.